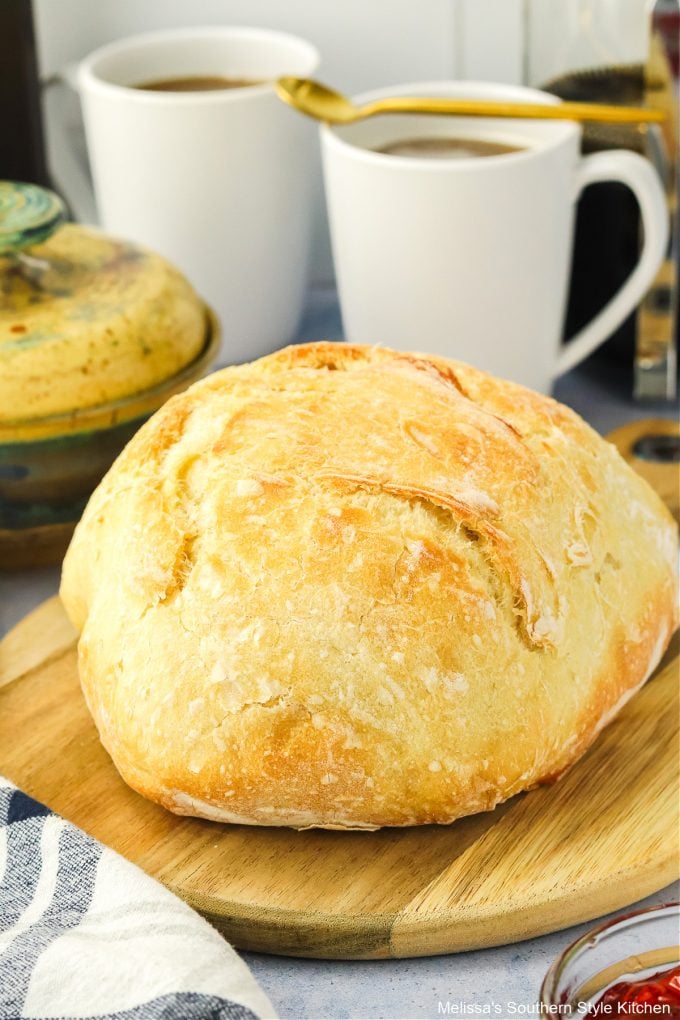
Sourdough Bread
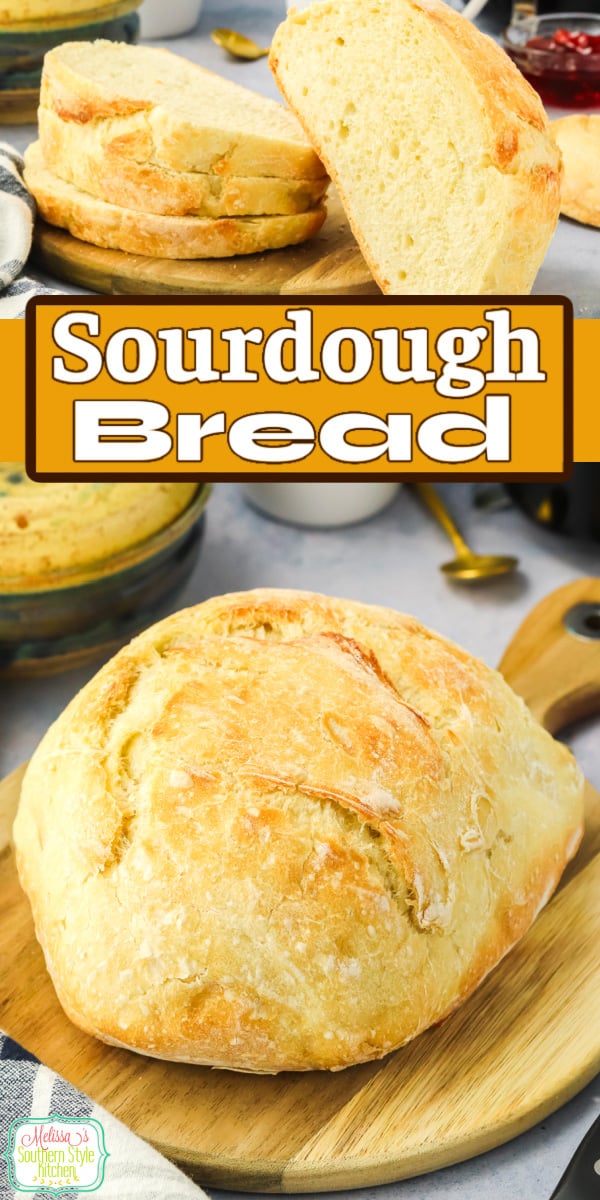
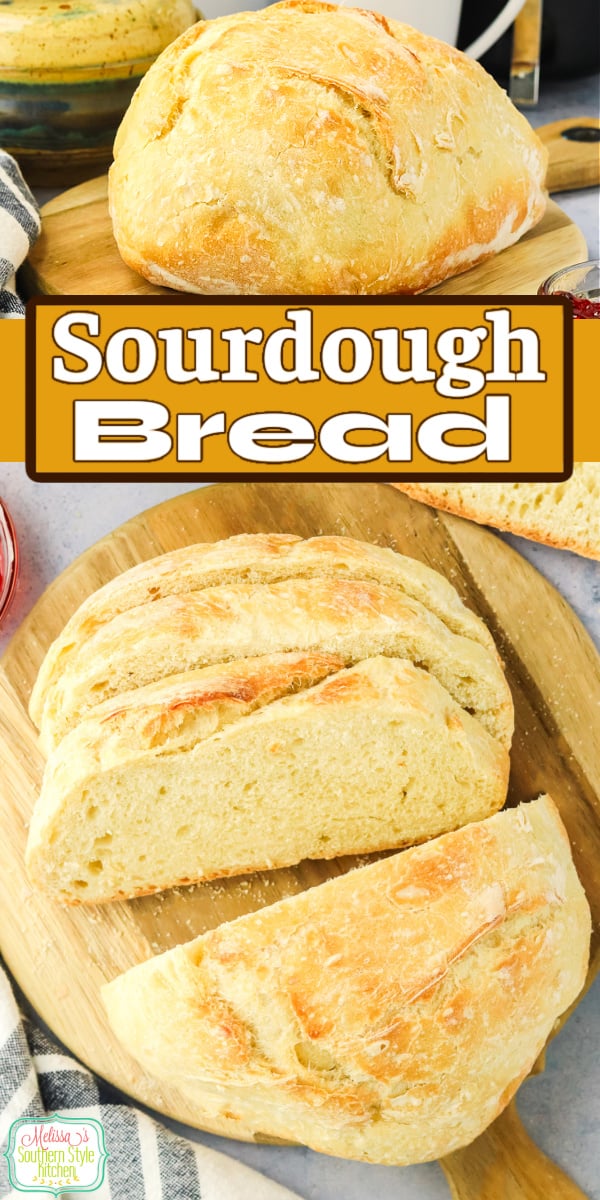
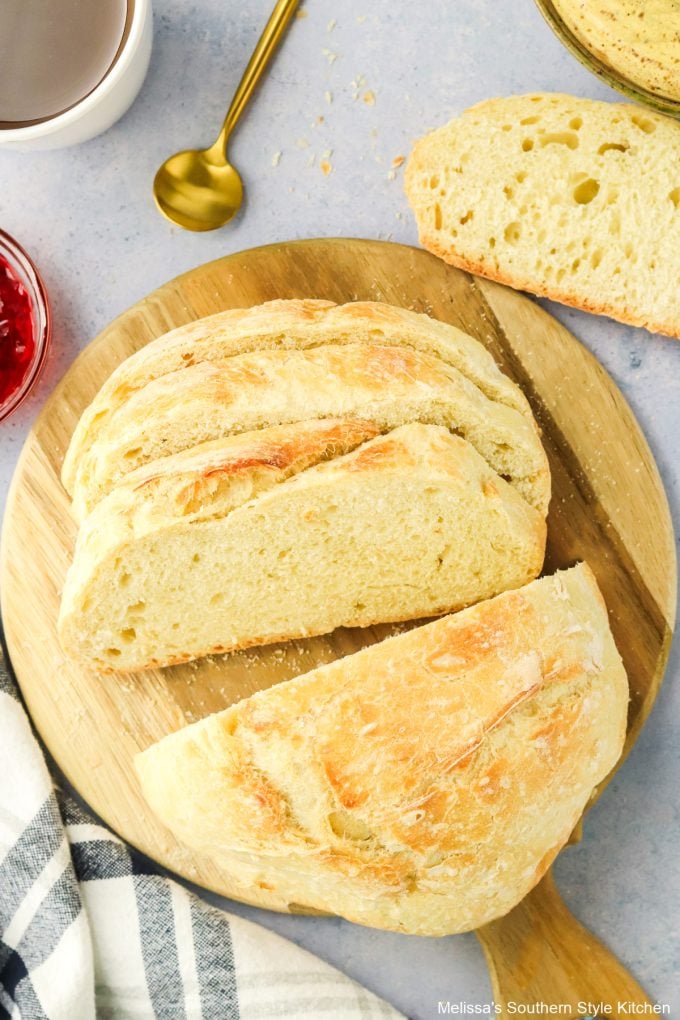
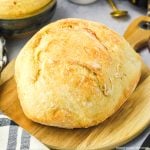
This homemade Sourdough Bread features a crispy outer crust and a soft, pillowy crumb on the inside. It features a nutty tangy flavor that makes it impossible to resist. Put your sourdough starter to use and enjoy baking this dutch oven Sourdough Bread at home.
Easy Sourdough Bread Recipe
There’s nothing like the smell of fresh bread baking in the oven. Sourdough bread requires several steps to make but none are difficult. This bread is a labor of love and worth every second. Once you master the process, you’ll find yourself making it over and over again. How to make Sourdough Bread with a starter: (Scroll down for full printable recipe.)
- Prepare the Starter – Prepare the Sourdough Starter in advance.
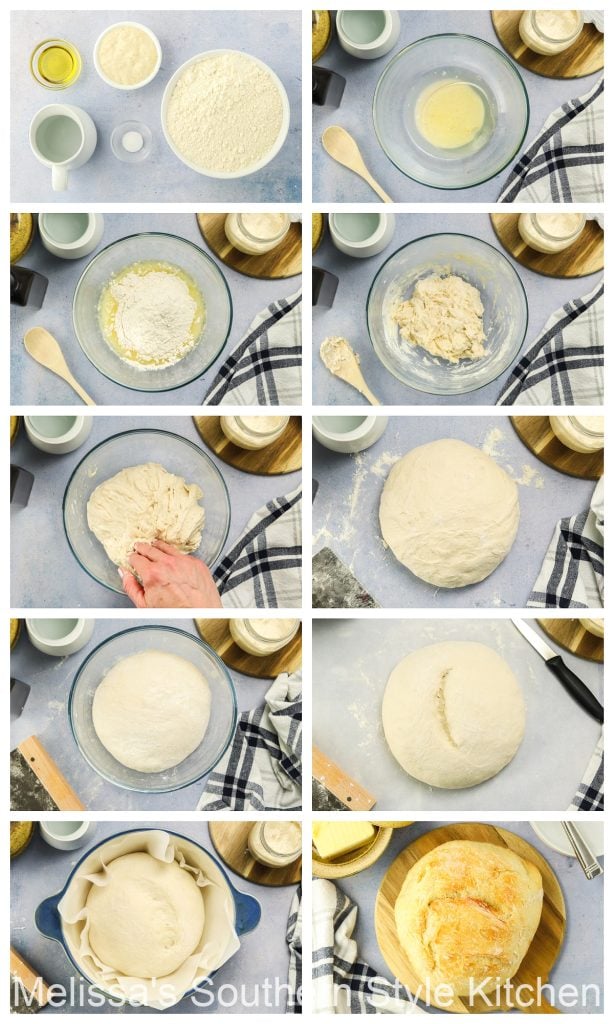
- Wet Ingredients – Use a large spoon or rubber spatula to stir together the starter, water and olive oil.
- Dry Ingredients – To the bowl add the flour and salt. Use a nonstick rubber spatula or a wooden spoon to combine the ingredients. Please Note: The dough won’t be soft but rather shaggy, this is okay and completely normal. Don’t over-mix the dough, you just don’t want dry flour in the mixture. Cover the bowl with a dry towel and let it stand for 30 minutes.
- Stretch and Fold the Dough – Grab one side of the dough and lift it just above the lip of the bowl and fold it over the other side. Turn your bowl 90 degrees and stretch and fold the dough again. Repeat this process 4 times then cover the bowl.
- Continue to Stretch and Fold the Dough – Repeat this process every 30 minutes for 4-6 hours. The dough will rise very slowly during this process. Unlike traditional yeast dough, sourdough will only rise about 50%-70%.
- Shape into a Ball – Once the dough has risen, turn it out onto a lightly floured surface. Shape the dough into a soft ball and let it stand on the counter for 20 minutes to rest.
- Cold Proof – Sprinkle the inside of a clean mixing bowl with flour. Place the dough inside and put in the fridge for 24 hours to cold proof.
- Heat Dutch Oven – After the cold proofing for 24 hours preheat the oven to 450°F. Place the covered dutch oven into the oven while it preheats.
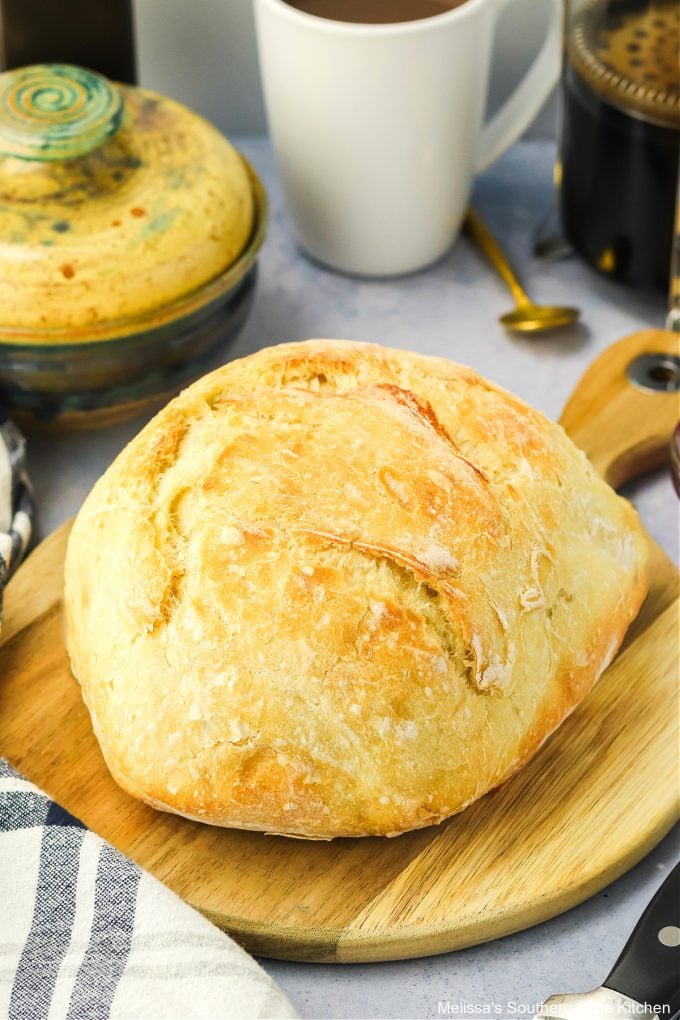
- Transfer Dough to Parchment Paper – Remove the dough from the fridge and turn the dough it out onto a piece of parchment paper. Shape into a ball and score the top with a sharp knife about 1/4 of an inch deep and a couple of inches across.
- Oven – Pick up the dough by the parchment edges and carefully place inside the hot dutch oven.
- Lower the Temperature – Lower the oven temperature to 425°F. Cover and bake for 30 minutes. Take the lid off the dutch oven and bake for another 10-15 minutes.
- Cool – Remove the bread from the dutch oven using the parchment paper and let cool for 20-30 minutes, then slice and serve.
How to Make the BEST Sourdough Bread Recipe
- Ingredients you’ll need to make homemade Sourdough Bread: Sourdough starter (active, fed and bubbling), warm water, olive oil, bread flour plus additional as needed for proofing, salt
- Kitchen tools you’ll need: Large bowl, measuring cups and spoons, sharp knife, parchment paper and 6 quart or larger dutch oven.
- The sourdough starter must be active and feeding before you start this process. This may require you to feed your starter 1-2 times a day for a few days before you start this recipe.
- This dough can be incredibly sticky to work with. You can dampen your fingers with cool water before handling. This will help prevent it from sticking to your fingers and allow you to work with it more easily.
- The flavor of the sourdough is much more complex than yeast bread. The cold proof is really important to get those perfect air bubbles in the bread and for depth of flavor. This is sourdough bread, afterall.
- That point being made, you don’t absolutely have to cold proof the bread if time is an issue. You can leave it on the counter for the second rise in a warm spot covered with a damp cloth. It should increase in size and nearly double. Depending on the ambient temperature this could take anywhere from 2 – 3 1/2 hours.
- If the bread still needs some crisping on the outside of the loaf after you have finished baking, simply remove the loaf from the dutch oven and place directly on a rack in the oven and bake for an additional 3-5 minutes.
- Preheating the dutch oven results in a crispier crust. You can feel the texture as you slice through. Is it necessary? That depends on whether a crispy outside is important to you. To me it is vital so a resounding, yes!
- Variations: Want to try a different version? Swap out the bread flour with whole wheat or rye.
- Keep leftovers in an airtight container at room temperature for up to 3 days.
- You can freeze this bread in freezer wrap or airtight container for up to 3 months. Thaw on the counter when you are ready to eat.
- You can also slice the bread when it’s slightly frozen to make toast, grilled cheese or homemade croutons.
More Homemade Bread Recipes to Make
- Enjoy this pull apart Dollywood’s Famous Cinnamon Bread.
- Homemade Cinnamon Swirl Raisin Bread.
- Tear and Share Cheesy Italian Bread Twists is made using frozen bread dough.
- You can whip-up a loaf of Beer Bread in no time flat.
- This Reese’s Peanut Butter Banana Bread is a treat any time of day.
- My recipe for Dutch Oven Artisan Bread is made much like Sourdough but using yeast.
- Easy Irish Soda Bread can be made by bakers of all skill levels.
- Pumpernickel Bread from The Kitchn.
Thanks for visiting come back soon!
Disclosure ~ If a purchase is made using one of the affiliate links on this website we may earn a small commission at no additional cost to you. Thank you!
Helpful Kitchen Items:
Sourdough Bread Recipe
Ingredients
- 2/3 cup sourdough starter (active, fed and bubbling)
- 1 1/2 cups warm water
- 2 Tbsp olive oil
- 4 cups bread flour plus additional as needed for proofing
- 2 tsp salt
Instructions
- Prepare the Sourdough Starter in advance.
- In a large bowl, use a large spoon or rubber spatula to stir together the starter, water and olive oil.
- To the bowl add the flour and salt. Use a nonstick rubber spatula or a wooden spoon to combine the ingredients. Please Note: The dough won’t be soft but rather shaggy, this is okay and completely normal. Don’t over-mix the dough, just make sure there is no dry flour in the mixture. Cover the bowl with a clean dry towel and let it stand for 30 minutes.
- Stretch and fold the dough. Uncover and grab one side of the dough and lift it just above the lip of the bowl folding it over the other side. Turn the bowl 90 degrees and stretch and fold the dough again. Repeat this process 4 times then re-cover the bowl.
- Repeat the stretching and folding process every 30 minutes for 4-6 hours. The dough will rise very slowly during this process. Unlike traditional yeast dough, sourdough will only rise about 50%-70%. (The ambient temperature will affect how quickly the dough rises. The warmer the location the more quickly it will increase in volume.)
- Once the dough has risen, turn it out onto a lightly floured surface. Shape the dough into a soft ball and let it stand on the counter for 20 minutes to rest.
- Sprinkle the inside of a clean mixing bowl with flour. Place the dough inside and put in the fridge for 24 hours to cold proof.
- After the 24 hours, preheat the oven to 450°F. Place the covered dutch oven into the oven while it preheats.
- Remove the dough from the fridge and turn the dough it out onto a piece of parchment paper. Smooth and shape into a ball and score the top with a sharp knife about 1/4 of an inch deep and a couple of inches across.
- Pick up the dough by the parchment edges and carefully place inside the hot dutch oven. Lower the oven temperature to 425°F. Cover and bake for 30 minutes.
- After 30 minutes remove the lid off the dutch oven and bake for another 10-15 minutes until golden.
- Remove the bread from the dutch oven using the parchment paper and let stand for 20-30 minutes, then slice and serve.
Notes
-
- The flavor of the sourdough is much more complex than yeast bread. The cold proof is really important to get those perfect air bubbles in the bread and for depth of flavor.
- That point being made, you don’t absolutely have to cold proof the bread, if time is an issue. You can leave it on the counter for the second rise in a warm spot covered with a damp cloth. Depending on the ambient temperature this could take anywhere from 2 – 3 1/2 hours.
- The dough should increase in size and nearly double. Begin the recipe at Step #9.
- Please note: Warm proofing will result in a more dense bread that’s not quite as tangy in flavor.
Can the dough be in the shape of a loaf of bread? Can I use a loaf style bread pan to bake this?
Yes, if you prefer.
Can this be made with a half regular flour and half whole wheat flour?
Half all purpose flour and half wheat flour is fine.